
macOS 27: let Bouncer see your browser profiles
To see your Chrome, Brave, Edge, and Firefox profiles in Bouncer on macOS 27, turn on Bouncer’s switch for each browser in System Settings. The switches are in System Settings > Privacy & Security > Files & Folders, together under Bouncer. One trip covers every browser. It needs no password and no restart.
Safari, Arc, Dia, Vivaldi, and Opera need no switch.
Each switch lets Bouncer read that browser’s list of profiles. When you run Find Routing Mistakes, it also lets Bouncer read the browser’s history. Nothing leaves your Mac.
Turn on the switches
Section titled “Turn on the switches”Start from any of Bouncer’s Open System Settings… buttons. See Where Bouncer asks.
- Click Open System Settings… in Bouncer. System Settings opens at Privacy & Security > Files & Folders. A guide from Bouncer, titled Let Bouncer see your profiles, shows next to the window.
- Click the arrow next to Bouncer, as the guide says. Bouncer’s switches appear under it.
- Turn on each browser that the guide lists under Turn on:. Brave’s switch is named Brave Browser.
- Check the guide. A ✓ appears next to each browser about 2 seconds after you turn on its switch.
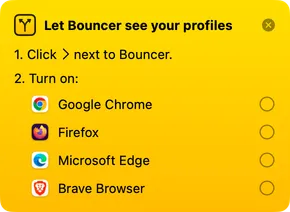
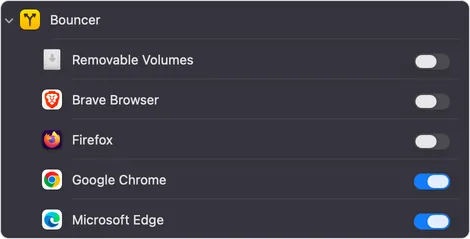
When every browser has a ✓, the guide says Done and closes. Bouncer brings back the window you started from. Onboarding goes on by itself, and Find Routing Mistakes searches again. Your profile names then appear everywhere in Bouncer.
The guide lists the browser you started from. It also lists any other browser that needs a switch and has 2 or more profiles.
The guide shows only while System Settings is in front. To stop, click the close button on the guide. Bouncer brings back the window you started from. The guide waits 5 minutes, then closes. If you turn on a switch after that, Bouncer notices the next time you switch to it.
Where Bouncer asks
Section titled “Where Bouncer asks”Bouncer asks for a switch only where it would list that browser’s profiles. Onboarding asks only when the browser has 2 or more profiles. With one profile, there is nothing to choose between.
Each note says what to turn on, such as “Give Bouncer access to your Google Chrome profiles in System Settings › Privacy & Security › Files & Folders.” Each note has a Learn more link to this page and an Open System Settings… button. You can start from any of these places:
- Onboarding, on the Let Bouncer see your profiles screen. Click Open System Settings…, or click a browser.
- Settings > Browsers, with the browser selected, under Find Google Chrome Profiles.
- The warning under a dimmed profile pop-up in the rule editor, Settings > General, and presets. It reads “Bouncer can’t see your Google Chrome profiles until you give it access in System Settings › Privacy & Security › Files & Folders.”
- Find Routing Mistakes, when it skipped a browser’s history. The note starts with “To search all your history”. If Bouncer could search no history at all, it shows Bouncer Couldn’t Search Your History.
The browser picker has no note of its own. While a browser’s switch is off, the Customize Browser Picker window shows “Bouncer can’t see all your browser profiles.” Its Learn more opens Settings > Browsers at that browser.
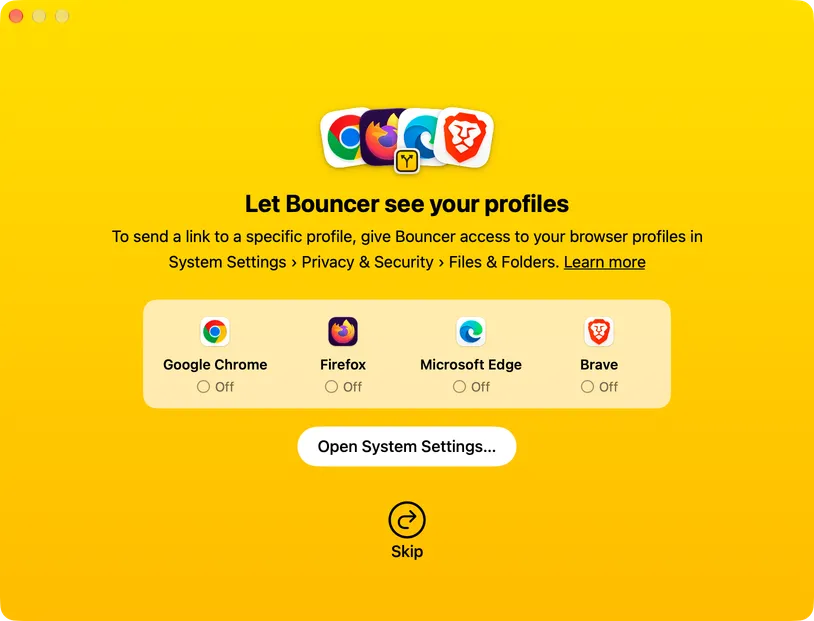
The onboarding screen is the first permission screen. Each browser on it shows On with a ✓ once its switch is on, or Off. You can click Skip without confirming. Links still open in the right profile, and Bouncer asks again only where it would list that browser’s profiles.
Until a switch is on
Section titled “Until a switch is on”Links open in the right profile either way. Your rules keep their profiles, and Bouncer opens each link in the profile its rule names. Until you turn on a browser’s switch:
- Settings > Browsers shows Find Google Chrome Profiles, with the browser’s name, instead of the browser’s profiles. A warning triangle marks the browser’s icon in the sidebar.
- In the rule editor, Settings > General, and presets, the browser’s profile pop-up is dimmed. It offers no profiles to choose.
- A profile you chose earlier shows as Saved profile. It still works.
- The browser picker shows the browser without its profiles.
- Find Routing Mistakes skips the browser’s history.
To open Slack workspace links in the Slack app on macOS 27, turn on one more switch, named Slack. It’s there when you installed Slack from the App Store. Onboarding doesn’t ask for it.
Bouncer asks in a note under Open in… in the rule editor when you choose Slack. The note also appears under Prefer native apps in Settings > General when that setting is on. It reads “To open workspace links in the Slack app, give Bouncer access to Slack in System Settings › Privacy & Security › Files & Folders.” Click Open System Settings…. The guide is titled Let Bouncer open Slack links, and it lists only Slack. See Slack links open in Slack.
If a switch is missing or off
Section titled “If a switch is missing or off”There is no Firefox switch
Section titled “There is no Firefox switch”Firefox’s switch appears after Firefox has run once on macOS 27. Open Firefox, then come back to System Settings. When Firefox is the only browser left, the guide says “No Firefox switch? Open Firefox once, then come back.”
If the guide has closed, open Settings > Browsers, select Firefox, and click Open System Settings….
Files & Folders shows two Bouncer items
Section titled “Files & Folders shows two Bouncer items”If you used an early test version of Bouncer, Files & Folders can show two Bouncer items. Only one of them is the Bouncer you use now. Click the arrow next to each, and use the one that lists your browsers.
If both list your browsers, turn on a switch under one of them and watch the guide. If no ✓ appears after a few seconds, turn that switch off again. Then use the other Bouncer item.
A switch turned itself off
Section titled “A switch turned itself off”Bouncer’s switches turn off after you run a copy of Bouncer that is signed differently, such as a test build. Bouncer updates keep your switches on.
To turn a switch on again, open Settings > Browsers, select the browser, and click Open System Settings…. Then follow the steps in Turn on the switches.